
Orbitas™
Project manager
Unlock New Possibilities with Projects Manager
Take control of your workflow and elevate productivity with powerful project management tools designed for Orbitas. Seamlessly import external data sets and job files, then dispatch Orbitas Projects directly to your field users for instant access and collaboration. Effortlessly manage multiple projects at once with multi-project storage and organization, and make real-time updates by editing features, layers, and symbology right within Orbitas Projects. When your work is complete, export projects with ease—keeping your data organized, accessible, and ready for the next step.
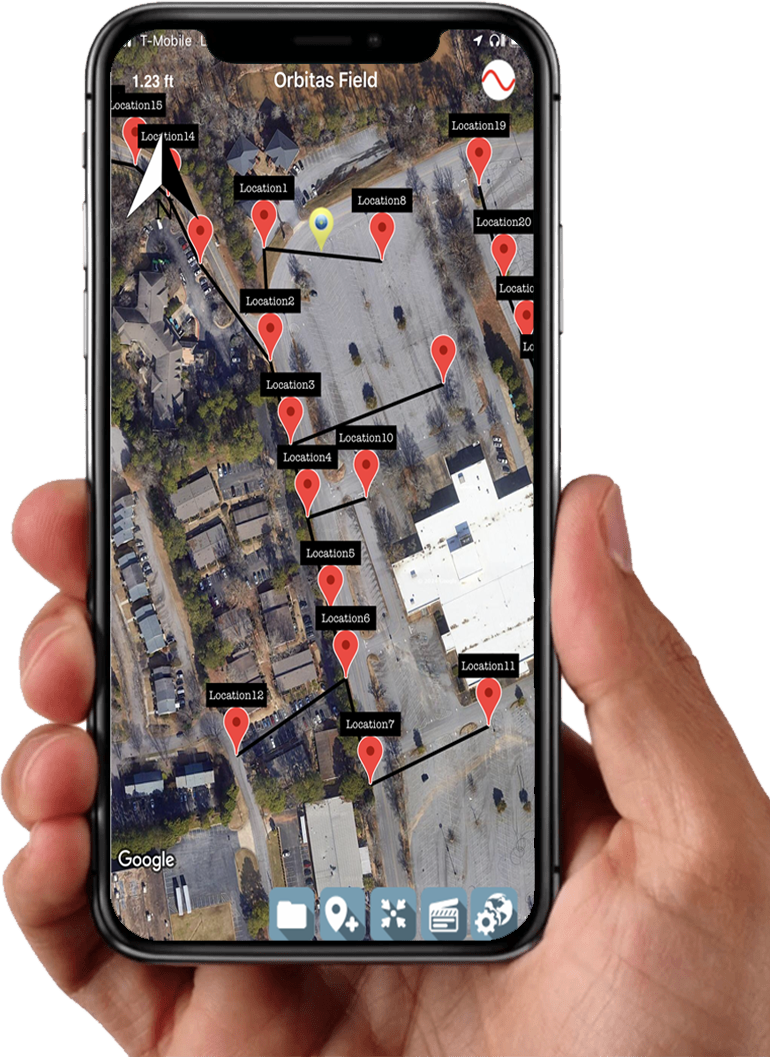
Additional Information about
Orbitas Projects Manager
- An Orbitas Projects Manager is a new feature that allows any user to Adminsiter Orbitas Projects.
- If an Orbitas Projects Manager is added to a User with no other licenses, they will only be able to manage their own custom data for import into Projects.
- If an Orbitas Projects Manager is added to a Orbitas Pro User, they will be able to manage their own custom import data as well as any Jobs uploaded by themselves.
- If an Orbitas Projects Manager is added to a Subscription Administrator, they will be able to manage their own custom imported data, as well as any User’s job within their subscription.
- Orbitas Projects Managers cannot be added to a Group Administrator because Projects are tracked on the Subscription level.
- *Format limitations apply, See included formats for full details.
Orbitas™ Formats
Standard Job Exports
ESRI Shapefile
Google KMZ
PNEZD (Import and Export)
Additional Exports Standard for Partner Users
Partner XML
Partner JSON (Import and Export)
Additional Exports Standard for AT&T Contractors
Clearion Shapefile Format
AutoCad DWG (Formatted for AT&T As-Builts)
1 Spatial Internal Feature Format (IFF)
12d Model
Actian Ingres Non-Spatial
Actian Ingres Spatial
Adobe 3D PDF
Adobe Flash (SWF)
Adobe Geospatial PDF
Adobe Illustrator – Avenza MAPublisher
Adobe Illustrator (IEPS) Adobe Product Representation Compact (PRC)
Aircom ENTERPRISE Map Data/ASSET Data
AIXM 4.5 (Aeronautical Information Exchange Model XML version 4.5)
AIXM 5.x (Aeronautical Information Exchange Model GML)
Amazon Aurora Non-Spatial (MYSQL_AURORA_NONSPATIAL)
Amazon Aurora Spatial (MYSQL_AURORA_SPATIAL)
Amazon DynamoDB Amazon Redshift
Amazon Redshift Spatial
Apache Parquet
ASPRS LiDAR Data Exchange Format (LAS)
ASTM E57
Australian Asset Design and As Constructed (ADAC)
Autodesk 3ds
Autodesk AutoCAD DWF
Autodesk AutoCAD DWG/DXF
Autodesk AutoCAD Map 3D Object Data
Autodesk FBX
Autodesk IMX
Autodesk MapGuide SDL
Autodesk ReCap
Bathymetric Attributed Grid (BAG)
BC MOEP
BC MoF Electronic Submission Framework (ESF)
Bentley MicroStation Design
Bentley MicroStation GeoGraphics
BIM Collaboration Format (BCF)
CADRG (Compressed ARC Digitized Raster Graphics)
Canadian Council on Geomatics Interchange Format (CCOGIF)
Canadian Digital Elevation Data (CDED)
Caris NTX CARIS Spatial Archive (CSAR) Point Cloud
CARIS Spatial Archive (CSAR) Raster
CARTO
Cesium 3D Point Cloud
Cesium 3D Tiles
CIB (Controlled Image Base)
CITS Data Transfer Format (QLF)
CityJSON
CKAN DataStore (FME Desktop Package)
COLLADA (Collaborative Design Activity)
ComGraphix Data Exchange Format (CGDEF)
CouchDB
CSV (Comma-Separated Value)
Danish UFO
Data File
dBASE (DBF)
DICOM (Digital Imaging and Communications in Medicine)
DTED (Digital Terrain Elevation Data)
Dutch Top10 GML
E00 (Esri ArcInfo Coverage/Esri ArcInfo Export)
Elastic Elasticsearch
BC MoF Electronic Submission Framework – (XSD-Driven)
Encapsulated PostScript (EPS)
Epic Games Unreal Datasmith (UDATASMITH)
ER Mapper ECW
ER Mapper ERS
ERDAS IMAGINE
ERDAS RAW
Esri-JSON (Esri JavaScript Object Notation)
Esri .hdr RAW Raster
Esri ArcGIS Online (AGOL) Feature Service
Esri ArcGIS Portal Feature Service
Esri ArcInfo Generate
Esri ASCII Grid Esri Geodatabase (ArcSDE Geodb Mosaic Dataset)
Esri Geodatabase (ArcSDE Geodb Raster Dataset)
Esri Geodatabase (ArcSDE Geodb)
Esri Geodatabase (File Geodb Open API)
Esri Indexed 3D Scene Layer (I3S)
Esri Knowledge Esri Mapping Specification for CAD (MSC)
Facet XDR
File Copy
FITS (Flexible Image Transport System)
FME Augmented Reality (FME AR)
FME Augmented Reality (FME AR) (Deprecated)
FME Feature Store (FFS)
FME Server Automations
Garmin GDB
Garmin GPI
Garmin MapSource
Garmin POI Generic (Any Format)
GeoConcept Map
General Transit Feed Specification (GTFS)
GeoJSON (Geographic JavaScript Object Notation)
GeoRSS/RSS Feed
GeoTIFF (Georeferenced Tagged Image File Format)
GIF (Graphics Interchange Format)
GIF Rasterizer
glTF (GL Transmission Format)
Golden Software Surfer Binary Grid
Google BigQuery
Google Cloud Spanner
Google Cloud SQL Non-Spatial (MYSQL_GOOGLE_DB)
Google Cloud SQL Spatial (MYSQL_GOOGLE)
Google Fusion Tables (Non-Spatial) (Service Ended December 3, 2019)
Google Sheets Google Sheets v4 (FME Desktop Package)
Google WebP GPS eXchange Format (GPX)
Graphic Technologies, Inc. (GTI) GTViewer
Halliburton GeoGraphix CDF
HERE Venue Map (GML)
HTML
HYPACK Border
IBM Cloudant
IBM DB2/Db2 Warehouse on Cloud Non-Spatial
IBM DB2/Db2 Warehouse on Cloud Spatial
IBM DB2 Non-Spatial (JDBC)
IBM Informix Non-Spatial
IBM Informix Non-Spatial (JDBC)
IBM Informix Spatial
IBM Netezza Spatial and Non-Spatial
IBM PASW (SPSS) .sav
IDRISI Raster
IDRISI Vector Format
Indoor Mapping Data Format (IMDF)
Industry Foundation Class STEP/XML Files (IFC)
InSAR Scientific Computing Environment (ISCE)
INSPIRE GML
Intergraph FRAMME Standard Exchange Format (SEF)
Intergraph GeoMedia SQL Server Warehouse
Intergraph MGE
Intergraph Raster ITT ENVI .hdr Raw Raster
JDBC (Java Database Connectivity)
JPEG (Joint Photographic Experts Group)
JPEG 2000 (GeoJP2/GMLJP2)
JSON (JavaScript Object Notation)
Landmark Z-Map Vector
Landmark Z-Map Grid
LandXML Leica Independent Data Exchange Format (IDEX)
MapBox MBTiles
MapBox MBTiles Vector Tiles (MVT)
Mapbox Vector Tile (MVT) and MVT Tileset
MapInfo SpatialWare
Marconi PlaNet
MariaDB/SkySQL (MySQL-compatible) Non-Spatial
MariaDB/SkySQL (MySQL-compatible) Spatial
Meta Raster Format (MRF)
Metria AutoKa Transfer File (FF)
Mojang Minecraft
Microsoft Access (JDBC)
Microsoft Access
Microsoft Azure Cosmos DB
Microsoft Azure SQL Database Non-Spatial (JDBC)
Microsoft Azure SQL Database Spatial (JDBC)
Microsoft Azure Storage Table
Microsoft Bitmap (BMP)
Microsoft DirectDraw Surface (DDS)
Microsoft DirectX
Microsoft Excel Reader (XLSXR) and (XLSXW)
Microsoft MapPoint Web XML
Microsoft OGDI DataLab
Microsoft PowerPoint
Microsoft SharePoint List
Microsoft SQL Server and Azure SQL Database (MSSQL_SPATIAL) Spatial
Microsoft SQL Server and Azure SQL Database Non-Spatial (MSSQL_ADO)
Microsoft SQL Server Non-Spatial (JDBC)
Microsoft SQL Server Spatial (JDBC)
Microsoft Word
MongoDB
MongoDB3
National Imagery Transmission Format (NITF)
NetCDF (Network Common Data Form)
NGDC Hydrographic Surveys Data Exchange (HYD93)
NIfTI (Neuroimaging Informatics Technology Initiative)
Northgate StruMap
OBJ
ODBC 3.x
OGC CityGML
OGC CSW (Catalogue Services for the Web)
OGC GeoPackage
OGC GeoPackage Tiles
OGC GML (Geography Markup Language)
OGC GML v2.1.2 (Geography Markup Language)
OGC GML SF-0 (Geography Markup Language Simple Features Level SF-0 Profile)
OGC/Google KML
OGC IndoorGML
OGP P1/90 Post Plot Positioning Data
OpenSceneGraph (OSGB/OSGT)
OpenStreetMap (OSM) XML
Oracle Autonomous Non-Spatial
Oracle Autonomous Spatial Object
Oracle Non-Spatial
Oracle Spatial GeoRaster
Oracle Spatial Object
Oracle Spatial Point Cloud
Oracle Spatial Relational
Oracle SQL Loader
PCD (Point Cloud Data)
PCI Geomatics Database File (PCIDSK)
PenMetrics GRD
PHOCUS PHODAT
Pixar USD (Universal Scene Description)
PNG (Portable Network Graphics)
PNG Rasterizer
Point Cloud XYZ (POINTCLOUDXYZ)
Pointools POD
PostGIS (Raster) PostGIS
PostgreSQL
Precisely MapInfo Extended TAB
Precisely MapInfo MIF/MID
Precisely MapInfo TAB (EFAL) (Technology Preview)
Precisely MapInfo TAB (MAPINFO/MITAB)
Precisely MapInfo Vertical Mapper Grid (NGrid)
Presagis .flt (OPENFLIGHT)
QVX (QlikView Data Exchange)
R Statistical Data (RData) Array as Raster
R Statistical Data (RData) Non-Spatial
R Statistical Raster Data (RRASTER) .grd
Regional Geographic Information System (REGIS)
Salesforce
SAP HANA and Cloud Platform HANA Service Non-Spatial
SAP HANA and Cloud Platform HANA Service Spatial
SAP Sybase Adaptive Server Enterprise (ASE)
SAS (Statistical Analysis System)
SeabedML (GML) SEG-Y SGI Image
Smallworld 3
Smallworld 4/5
Snowflake Non-Spatial
Snowflake Spatial
Socrata DataSync
Socrata2(FME Desktop Package)
SOSI GML
SpatiaLite
SQLite
SQLite Spatial (GDAL) (SpatiaLite)
STAR-APIC Mercator MCF STL (Standard Triangle/Tessellation Language)
Sun Raster
SVG (Scalable Vector Graphics)
Swedish I2K/G2K (Interface 2000 GML)
Swedish KF85
Swedish Masik
Swiss INTERLIS (ili2fme)
Tableau Data Extract (TDE)
Replaced by Tableau Hyper
Tableau Hyper
Teradata Non-Spatial
Teradata Spatial
Terrasolid TerraScan
TetGen
Text Feature Store (TFS) Fixed Schema
Text Feature Store (TFS) Variable Schema
Text File
TIFF (Tagged Image File Format)
TomTom POI
TopoJSON (Topology JavaScript Object Notation)
Trimble SketchUp
Unfolded Data (FME Desktop Package)
U.S. Geological Survey Digital Elevation Model (USGSDEM)
UK OS MasterMap Greenspace Layer (GML)
UK OS MasterMap Highways Network (GML)
UK OS MasterMap Sites Layer (GML)
UK OS MasterMap Topography Layer (GML)
UK OS MasterMap Water Network (GML)
Vector Markup Language (VML)
Vector Product Format (VPF) Coverage and Database
VOIV (VoxelGeo OpenInventor)
X11 Pixmap (XPM)
X3Dand VRML
XML (Extensible Markup Language)
XSD-Driven XML